Hey all! I wrote this article on Medium, but wanted to copy the content here (so it’s globally search indexed). Hopefully it helps explain some advanced use-cases for Blockstack!
(*The main article has some extra code gists that might be missing from the copied content below)
Blockusign App: A Pragmatic Approach to Smart Contracts and Anchoring Data to the Blockchain Using Blockstack

Jan 27
Bitcoin automates the bank, Blockusign automates verification.
Anchor documents, PDFs, tweets, videos and just about any digital file to the blockchain! Verify something happened without a third party!
Intro
The power Blockstack enables with their protocol and developer tools is often hidden. Sure, you can build scalable, efficient, decentralized applications with Blockstack’s developer tools. Sure, you can achieve off-chain decentralization with on-chain decentralized user identities. But Blockstack makes so much more possible, including on-chain data storage when needed, by anchoring data hashes to the blockchain. This gives the developer the ability to store immutable data!

Blockstack

Blockusign
It’s safe to say that very little data actually needs to be stored on-chain. That’s part of what makes Blockstack different. They embrace this idea and build around it to help developers create decentralized apps that are every bit as performant as their centralized counterparts. But there are times, without a doubt, when on-chain data storage is important.
This is especially true with an app like Blockusign.
This article will go over a use case and a technical deep dive on how to write a “Smart Contract” and anchor immutable data to the blockchain using Blockstack. Here is an outline of topics discussed in this article:
- Blockusign Use Case
- Blockstack Components
- Files and Hashes
- Saving Data to the Blockchain using Blockstack Subdomains Registrar
- Timestamping
- Immutable vs. Mutable Data
- Peer Replicated Storage
- Zonefiles
- Anchoring Data to Bitcoin in Batches
- Verifying Data and Digital Signatures Stored on the Blockchain
- Verifying a User and Attestations
- Trust but Verify the Blockstack Network
- Video Commentary Demo of Blockusign
Blockusign
Blockusign is a digital records verification platform. It allows you to send contracts out for signature, verify information from external sources, and prove the validity of information and events. It also lets you record a short video attesting that you signed the document. It puts humanity alongside digital signatures. Blockusign stamps data to the blockchain and ensures validity without a central authority. It also ensures the signed data can live on forever.
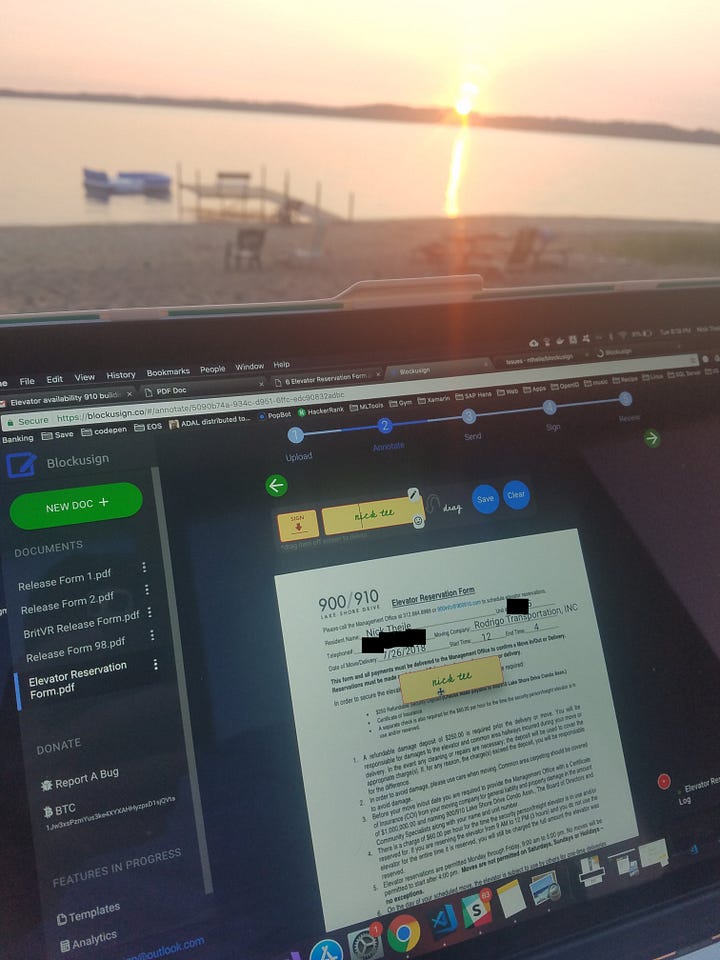
I used Blockusign on vacation to sign a moving form, while watching the beautiful sunset on Lake Michigan!
Let’s take a look at an example.
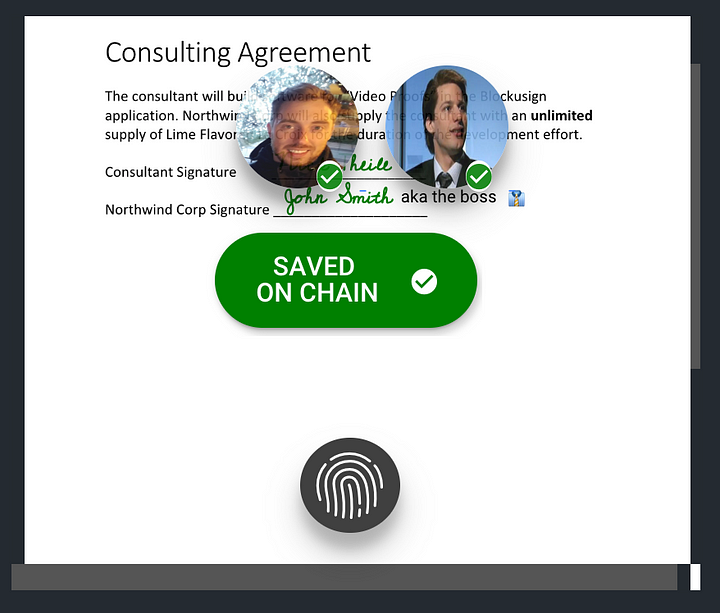
Use Case — Consulting Agreement
You are a programmer, named Nick, working as a consultant. You are hired by a small company, NorthWind, to complete a software task. You enter into a “Consulting Agreement” with a boss named John Smith. You agree to write code for a new feature, and part of the terms specify that you will receive an unlimited supply of lime flavored LaCroix for the duration of the project! You could write this as a “smart contract,” and download a wallet, and put cryptocurrency in it, and then write some code to save the contract to the blockchain. But that’s a bit too complicated for NorthWind and the boss.
There is a more human-centric pragmatic approach that can accomplish the same thing using technology people use today, like word processing and PDFs. You want to be able to prove the agreement took place and that both parties did, in fact, agree. With Blockusign, you can load the contract in as a PDF and send it over to your signer for a digital signature. When it’s all signed, the proof of signatures for both you and the company is recorded to the blockchain. That agreement is now forever verifiable.
Just like the grandma from the Frank’s Red Hot commercials says, “I put that sh*t on everything”… you can hash anything — even videos!

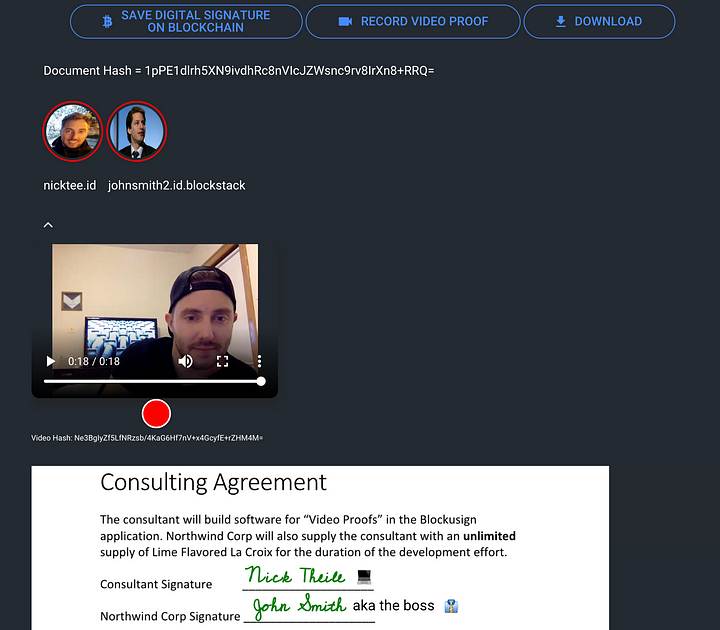
Here is demo of a feature in Blockusign called “Video Proofs.” This service hashes videos. It helps put humanity in such a digital process by allowing you to attach a short video attesting that you signed the document:

Demo of the “Consulting Agreement” using Blockusign Video Proofs
If there is a dispute, both parties can pull up the contract and use the blockchain as the “source of truth” mediator. The video above depicts the company NorthWind forgetting that they agreed to a term in the contract. They agreed to give Nick an unlimited supply of LaCroix for the duration of the project. LaCroix is a very addictive, bubbly and delicious drink for developers…and let’s just say he drank a lot of ‘em and charged up a sizable bill!
NorthWind refused to pay Nick for the LaCroix because they claimed they never agreed to that part of the contract. Nick was able to refute this claim and replayed the video to remind them that they agreed on the terms. He also verified the video and document hash (we will go over the technical details later). NorthWind reviewed their version of the video and document, and, in fact, realized Nick was correct. NorthWind agreed to pay Nick and a costly dispute was avoided.
This is all made possible because Blockstack already anchors data to the blockchain and has open sourced all of their tools. The same registrar that is used to create decentralized identities on-chain can be used to anchor other data. Blockusign is already proving this out.
Let’s explore how it works.
Blockstack Components
Let’s start off by going over the components used:
- Blockstack.js — The Blockstack JavaScript library for identity, auth and storage GitHub - stx-labs/stacks.js: JavaScript libraries for identity, auth, storage and transactions on the Stacks blockchain.
- Subdomains Registrar — Used to batch data to the blockchain then writes a zonefile to the Blockstack Atlas peer-to-peer network after 6 confirmations GitHub - stacks-archive/subdomain-registrar: Subdomain registrar for the Stacks network
- Blockstack Indexer — Indexes profile data; maps public keys to storage buckets; used in the verification process GitHub - stacks-archive/blockstack-search-indexer: Search indexer for Blockstack names and profiles
- Bitcoin Blockchain — Used to store a hash of data in the OP_RETURN code
Files and Hashes
First, you need a background on how Blockstack handles storage and what a file hash is.
Blockusign uses Blockstack’s Gaia storage to save the original file. Gaia is your own personal encrypted storage bucket. A file can be up to 25MB and even more if you run your own storage hub. Since most files are encrypted, you might want to limit the upload size to around 18MB because the size of the file will grow when you encrypt it. When something is important enough, you can hash it and store it to the Blockchain. You can anchor hashes for many things, including: documents, PDFs , videos, tweets, chat threads, Instagram videos and just about any digital file.
Here is an image from Blockusign. We store hashes of PDFs, SVGs, chat threads, and videos. Notice the hashes are small strings of characters. This fits nicely in Bitcoin’s OP_RETURN code, which can store 80 bytes of data.
The key to “Smart Contracts” on Blockstack is making sure both parties digitally signed the same hash (as depicted above). The digital signature is unique to you and nobody can forge it. The hash of the document is a “one way function,” meaning nobody can download the hash from the public blockchain and reverse engineer it to the original file. The address above represents your public key for the app and can be linked back to your Blockstack ID with any social attestations you provided. This is an important proof to make sure you are dealing with real users.
Here is how you can generate a SHA-256 hash of data using the sjcl.js library:
genHash(data){
  let hashBits = sjcl.hash.sha256.hash(data);
  let hashStr = sjcl.codec.base64.fromBits(hashBits);
  return hashStr;
}
Now that you know how to hash a file, we need to learn more about the base blockchain. Let’s dive into how Blockusign leverages a subdomain registrar to create what some people might call a “side chain” to store data.
Saving data to the Blockchain using Subdomains
The top level name blockusign1.id can be thought of as a virtual blockchain or database for Blockusign. It contains all the data that the Blockusign App needs to verify: when something was signed, who signed it, and if it’s an authentic signature.
The root hash is anchored to the bitcoin blockchain in batches using the Blockstack Atlas Network and subdomain-registrar protocol . This makes it cheap and efficient to use the blockchain. Best of all, the end user does not have to download wallet software or load it up with crypto. That is all handled by the registrar.
We believe user choice is key to decentralization, so if the application user chooses to use his own registrar they have that option! You can even download the Blockusign code on Githuband host it all yourself. If you want to setup your own registrar simply purchase a Blockstack name, then run the registrar (node.js app). Instructions here: GitHub - stacks-archive/subdomain-registrar: Subdomain registrar for the Stacks network
Timestamping
You can also use this technology to timestamp data. You can set your own interval to batch data and save to the blockchain. That means you can accurately timestamp when something happened within a 10 minute window. That’s pretty good considering it takes the ACH banking system several days to settle bank transfers.
We can prove “when, who, and what” happened, within 10 minutes without a third party! See https://forum.blockstack.org/t/immutable-storage/7205
Now that you have some basic knowledge about how a few core Blockstack components are used, let’s break down all the different layers of storage.
Mutable vs. Immutable Storage

There are 3 different types of storage for most blockchain applications: Immutable, Peer Replicated and Mutable.
- Immutable Storage ( Layer 1- base blockchain storage ) — Only use this storage for super important stuff — like verifying important signatures on a document. This storage is expensive and slow. You can only store a few bytes of data here. It’s slow by design for security. Thousands of servers save and synchronize the data. A consensus algorithm (PoW) is used to make sure the data in accurate, signed and verified. Bitcoin’s OP_RETURN code is used to store up to 80 bytes of data. It is soooooo secure you can do million dollar money transfers on it — therefore it’s secure enough for very important contracts.
- Peer Replicated Storage ( Layer 2- Peer-to-Peer Network ) — Use this layer for pointers to files. Blockstack uses this layer for zonefiles — mapping names to storage locations. Blockusign uses this for storing hashes of documents, videos and digital signatures of those hashes. You store pointers to stuff in your zonefile. They are mutable/updatable and peer replicated, but you can anchor a hash of the zonefile to the blockchain and do things to make it “immutable” (explained later). You can use the TXT entry of a zonefile to store hashes of important data that is kept in Gaia. One-to-Many servers can replicate this data. It can cost money to store data here, but you can store slightly larger files compared to the base blockchain.
- Mutable Storage ( Layer 3- off-chain storage ) — This is your user owned encrypted storage. It is usually backed by an S3 storage bucket or Azure blob storage. You can store really large files here. Most of the application state, images, files and databases should be stored here. In Blockstack, you store large files in your Gaia bucket. These files are mutable, meaning you can add/modify/delete and do just about anything to these files — because YOU OWN THEM!
Below is the logical hierarchy that the Blockusign App uses when persisting data to bitcoin using the Blockstack Subdomains protocol:
Let’s dive deeper into the peer replicated storage, specifically focusing on the zonefile.
Example Zonefile Schema
A Blockstack zonefile follow the DNS zonefile standard. It lives on the layer 2 peer-to-peer network and only gets propagated to the network after it hits 6 confirmations on bitcoin. This prevents spam on the network.
- *Note — In the Blockusign App the public key that owns this zonefile entry is a burn address so nobody can update this zonefile, thus making it immutable.
- **Note — the original Blockstack zonefile schema is maintained so the existing blockstack explorers will work (it might not work anymore with the new explorer, but you can lookup the raw data still via a core node) .
- *Note — The Blockusign system currently needs to append 0,1,2,3,4 etc… to the FILE_GUID to take into account if it was the 1st or 2nd or nth signer of the document up to 9 (due to name length restrictions in blockstack — the guids representing a document’s unique identifier is really long!)
Save Data to the Blockchain
Now that we have our zonefile formatted we need to save it to the blockchain!
Blockusign stores the data depicted below to a zonefile. The zonefile is then hashed and saved in a batch to the blockchain. Here is a picture of the data that is saved:

Blockusign saves this data in the zonefile as TXT entires
We have 4 steps to complete the process of saving data:
Step 1 — Propagate to the Subdomains Registrar
Step 2 — Anchor to Bitcoin
Step 3 — Propagate the zonefile to the Atlas peer-to-peer network
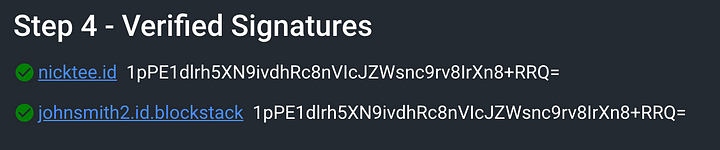
Step 4 — Verify the signatures

We save to the blockchain in batches via the subdomains registrar with an HTTP POST:

Next, we need to wait some time for the bitcoin transaction to get 6 confirmations. Here is an example bitcoin transaction that contains Blockusign data.

After 6 network confirmation, the data is synchronized across the Blockstack Atlas peer-to-peer network. You can now use a Blockstack explorer to see the data we saved in a zonefile:
https://core.blockstack.org/v1/names/d3cc22b8-160d-875f-2e7b-5a88c221ddb9.blockusign1.id
Verify that the Digital Signatures are authentic
The Blockusign app automatically verifies signatures but there is a ton of work that goes on behind the scenes. The user sees this (yay! green checkmarks)
nicktee.id | johnsmith2.id.blockstack
You need to do 3 things to manually verify and prove that a document was digitally signed by two (or more) parties and was not forged:
- Verify the hashes are authentic and each party has the same hash ( this means you signed the same doc )
- Verify the digital signatures are authentic for each party ( this means it was signed by you and not forged )
- Verify the zonefile file hash matches the hash stored on bitcoin. This means a batch of data was authentic and not forged. You can compare this to a stack of files on a notaries desk being stamped and authentic — but we use no centralized third parties, we use the bitcoin blockchain! MIND BLOWING, RIGHT!

If we are validating the document titled ‘ConsultingAgreement.pdf’ , this document has a public guid of d3cc22b8–160d-875f-2e7b-5a88c221ddb9. So we can look up this documents zonefile here https://core.blockstack.org/v1/names/d3cc22b8-160d-875f-2e7b-5a88c221ddb9.blockusign1.id
It looks like this:
Next, simply goto the zonefile and grab the hash and digital signature from the json file. This example uses Bitcore message signer to verify. Here is a sample script verifying digital signatures of our hashed document data:
If the message is verified it means the first party signed the document!
Now we need to prove the second party signed the same document. This means they have the same hash but with their own unique digital signature.
Now repeat this for the other user who signed the document with their digital signature. The second users file guid will be pre-pended with a 0 , the third signer (*not supported/tested yet) with a 1…etc.. So the second signers zonefile should be https://core.blockstack.org/v1/names/0d3cc22b8-160d-875f-2e7b-5a88c221ddb9.blockusign1.id
If the digital signature is valid for both parties then the document is authentic and it proves everyone agreed!

To most people the verification above just looks like a bunch of letters and numbers and crazy crypto math. How can we tell there is a real human behind that?
Map a User’s App Public Key to a Blockstack Name

The code above is fine and good, but nobody on the street identifies themselves by a bitcoin public address (unless you are shamelessly trying to get free money while tailgating at a nationally televised college football game).
So we need to map an address to a human readable Blockstack Name. Does this App Public key mean anything to you?
1FqX63G6pZ54wD97FbW1XvtXEmwgYLEsha
Probably not, but it actually links to my Blockstack Name nicktee.id . It’s actually a deterministic address because Blockstack uses Hierarchical Deterministic wallet technologies to give each app a separate public address. This is great for security and ensures another app cannot just start taking data from Blockusign. It sandboxes each app and it’s storage.
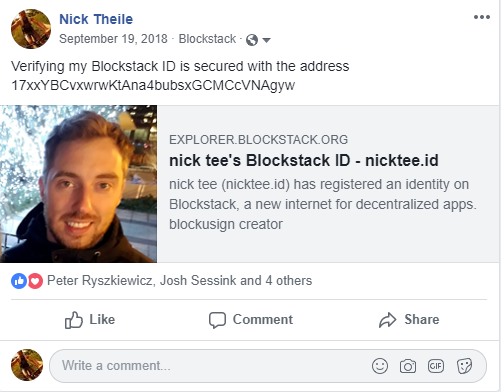
Map to a real world attestation (like Facebook)
Lastly, you can map this name to a tangible reputation you have in real life. If you click on the profile in the zonefile file you can see this address directly links to an attestation claim I stored on Facebook. https://gaia.blockstack.org/hub/17xxYBCvxwrwKtAna4bubsxGCMCcVNAgyw/profile.json
Look at the proofUrl property.
If you click on the link, this is what the real world attestation looks like on Facebook.
You can set many different social proofs in the Blockstack Browser including, Facebook, Github, HackerNews, Twitter, PGP and SSH keys
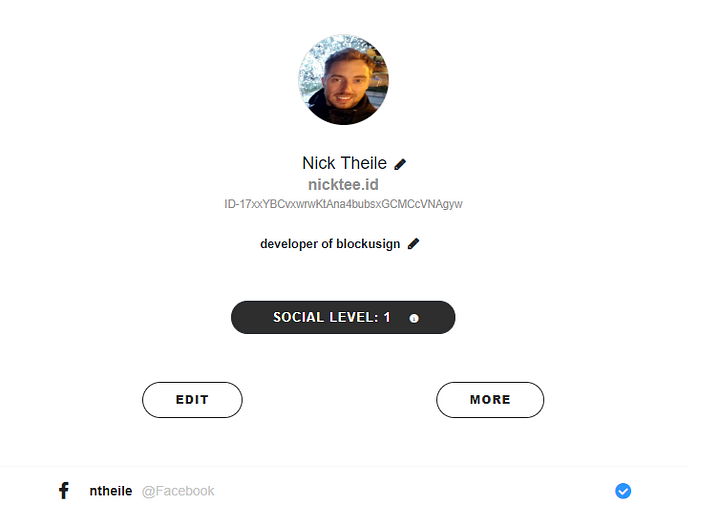
This is a simple way to link my reputation to my Blockstack name for a great proof of who I am. Not many people know about my Blockstack ID nicktee.id but I built up a strong reputation on Facebook over the past 10 years.
This comes in handy for a few uses cases. One use case is KYC (know your customer). Another is document signing, obviously used in Blockusign! This all come in handy if a dispute ever arises.
This is all really cool but how can we trust the Blockstack network? The answer is simple — Trust…but verify!
Finally! Trust…but verify the Blockstack Network
Verify the zonefile hash matches whats on Bitcoin — Like stated earlier, this is comparable to a notary verifying a stack of files having valid stamps on them. Here is the technical details on how to verify a zonefile:
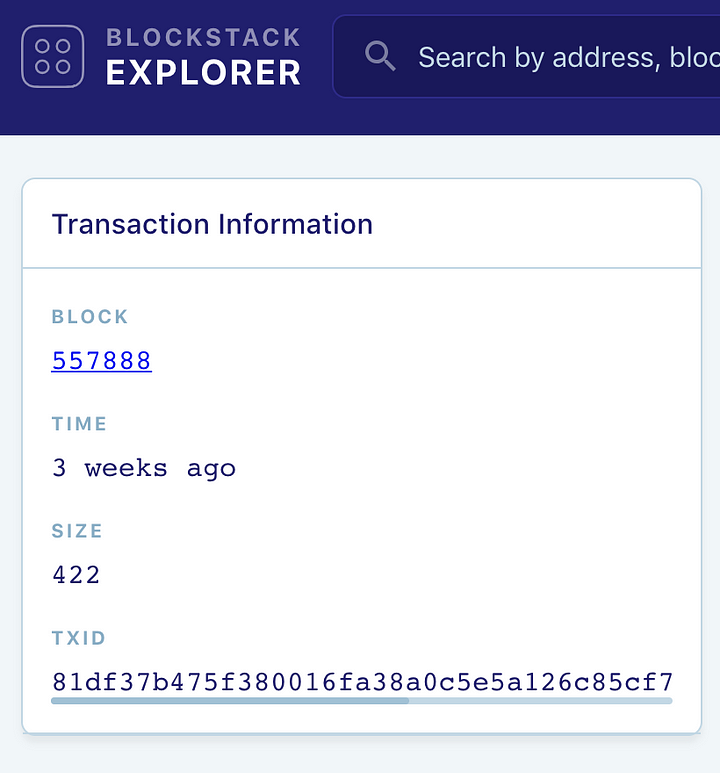
- Lookup the last_txid in the zonefile that you are trying to verify https://core.blockstack.org/v1/names/d3cc22b8-160d-875f-2e7b-5a88c221ddb9.blockusign1.id
“last_txid”: “81df37b475f380016fa38a0c5e5a126c85cf7cae7180a8af06da7c4c817211a2”
- Lookup the root hash on bitcoin by finding the latest transaction ID from the blockstack explorer under the recent operations section. Stacks Explorer by Hiro
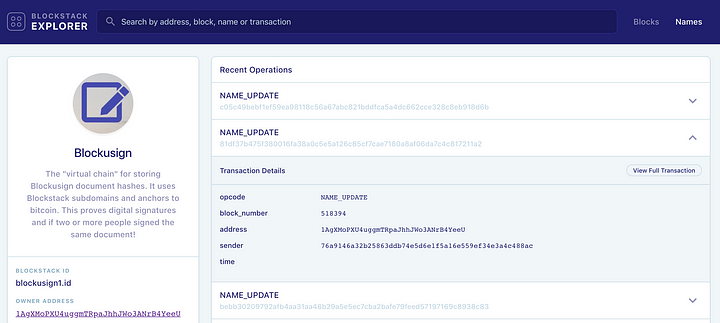
- In the Blockstack explorer, find the “name_update” that matches the “last_txid”. Expand it and “view full transaction”. Look for txid like this:
81df37b475f380016fa38a0c5e5a126c85cf7cae7180a8af06da7c4c817211a2
-
Now copy this transaction id and go to your favorite bitcoin block explorer Transaction: 81df37b475f380016fa38a0c5e5a126c85cf7cae7180a8af06da7c4c817211a2 | Blockchain.com
-
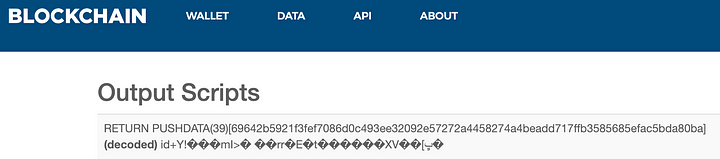
Look at the OP_RETURN in output scripts. You should see data like this
69642b5921f3fef7086d0c493ee32092e57272a4458274a4beadd717ffb3585685efac5bda80ba
-
The Blockstack wire format protocol will help make sense of this https://github.com/blockstack/blockstack-core/blob/master/docs/wire-format.md#name_update
-
So the part we care about is in BOLD
69642b5921f3fef7086d0c493ee32092e57272 a4458274a4beadd717ffb3585685efac5bda80ba
- The old block explorer showed more data about this and it used to be stored in the value_hash field on the UI. In the current Blockstack explorer I had to sniff out an HTTP call on the full transaction page here: Stacks Explorer by Hiro
I looked for this network request: https://blockstack-explorer-api.herokuapp.com/api/transactions/81df37b475f380016fa38a0c5e5a126c85cf7cae7180a8af06da7c4c817211a2
In the response payload, payload.out[0].script contains the relevant data
6a2769642b5921f3fef7086d0c493ee32092e57272 a4458274a4beadd717ffb3585685efac5bda80ba
- As you can see the hash on Blockstack matches the hash stored on bitcoin! a4458274a4beadd717ffb3585685efac5bda80ba. Now you can confirm that the bundle of data is valid. This means no data was forged and you can trust it!
Verified! Hooray! Here is your nice green check mark!
Outro

Thanks for reading how the Blockusign App takes a pragmatic approach to “Smart Contracts”, anchoring immutable data, and blockchain storage using Blockstack.
It was a long journey of learning and talking to the awesome engineers at Blockstack to get this far. Special shout out to Jude and Aaron! Here is the original forum post and conversation that really spawned this architecture: https://forum.blockstack.org/t/prove-two-parties-signed-a-copy-of-a-document-multi-sig-hash-op-return/6107
Please keep in touch with Blockusign on twitter @blockusignapp . We have a ton of new features planned! The new features revolve around the idea of “verifying public data”.
To leave you, below is an end to end video commentary, with our friend, Justin Hunter, of Graphite Docs (another great Blockstack app). Special thanks to him for writing an awesome intro for this article! In the video, we demo how to sign a Graphite Doc with Blockusign, then we verify the document is authentic without any third party intermediaries!
Cheers and Enjoy!
